
If you've never had sprouts before, go ahead and add our Getting Started With Sprouts Collection to your shopping cart. After you've had sprouts once, you'll be hooked!

Sprouts are the easiest way to elevate an everyday sandwich from mundane to memorable, adding nutrition and flavor to nearly any meal. Better yet, growing sprouts at home is simple and fun, even if you’re just getting started gardening.
What are sprouts, anyway?
Sprouts are essentially germinated seeds. Sprouts don’t require light or soil to germinate–all they need is water to break dormancy. And unlike seeds, sprouts are a living food that contain nutrients and compounds that are more readily absorbed by our bodies.
Don’t confuse sprouts with microgreens – while similar, the two crops are significantly different. Microgreens are typically grown in soil or another medium, and are harvested at the base of the plant. Sprouts, on the other hand, are grown for the complete plant–seed and all.
Beans are commonly used for sprouting, but not all sprouts are legumes. Alfalfa, clover, and mung beans are some of our favorite choices for sprouts, but you can also grow broccoli, radish, and even sunflower seeds for sprouting!
Sprouts are full of flavor and add texture to sandwiches, stir fries, salads–you name it. The refreshing crunch of sprouts is hard to beat, no matter what the dish.
Keep reading to learn how you can grow sprouts at home, and incorporate these tasty superfoods into more of your meal planning!

Equipment You’ll Need To Grow Sprouts
You can begin growing your own sprouts at home with just a few pieces of equipment, like our Sprouting Jar and Lid. Or, you may already have what you need on hand–a canning jar, canning ring, and cheesecloth or a mesh sprouting screen.
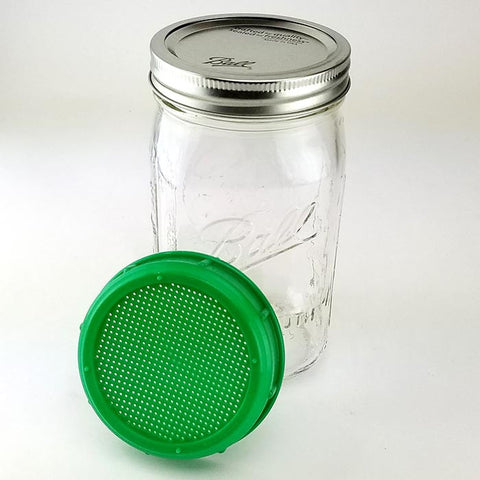
While premier equipment is nice to have for growing sprouts at home, there are cheaper options. You can substitute cheesecloth for a sprouting screen and use a rubber band instead of a canning ring.
Benefits Of Growing Sprouts
Growing sprouts is a perfect project for folks without much space to garden and anyone with the intention to eat healthier food for cheap. Whether you’re a seasoned green thumb or a brand-new gardener, you can easily grow your own sprouts at home!
Easy
Sprouts are inexpensive to grow and one of the easiest gardening projects you can take on. No need to have acres of land or a greenhouse, or fancy equipment like grow lights and seed-starting trays–you can grow pounds of fresh sprouts with a mason jar and a little water. Sprouts mature more quickly than microgreens, too–whereas microgreens take between one and two weeks to mature, most sprouts are harvestable in under a week.
Inexpensive
You can grow sprouts at home for the cost of seeds. Most packets of sprouting seeds cost less than $10, and since most folks have a few canning jars and rings at home, perhaps even a piece of cheesecloth or mesh, you won’t be much out of pocket. If you don’t have any mason jars at home, check a thrift store or ask a friend to save a buck!
Healthy
Not only are sprouts tasty, but they’re nutritious too! Loaded with antioxidants and nutrients, sprouts are the easiest way to incorporate more greens into your diet. Sprouts contain as much nutrition as full-grown plants in a compact package, so a healthy serving of sprouts will give you far more nutrition than a serving of mature vegetables!
Rich in easy-to-absorb vitamins and nutrients, sprouts are a superfood and a delicious way to consume more green vegetables. Plus, sprouts are a low-calorie food, so you can eat as much as you want!
Less waste
By growing your own sprouts at home, you’ll never have to worry about wasting store-bought produce–you can easily control how much you grow and when, so that you always have exactly enough sprouts to feed you and your family year-round.
Available year-round
It’s easy to eat in-season vegetables during the summer months, but it’s hard to find fresh produce in the dead of winter. Fortunately, sprouts are a fresh food that can be grown and eaten year-round, without the costs associated with shipping produce. Sprouts are one of the most environmentally-friendly, wallet-friendly, and body-friendly foods you can grow and eat!
Space and time-efficient
Growing sprouts takes up very little space, making it the perfect project for growers without a large garden. All you need is a sunny countertop and a few minutes twice a day to grow your own delicious and nutritious greens.

How To Grow Sprouts At Home
This simple five-step process will provide you with gorgeous greens year-round! Before you begin, gather your three essential pieces of equipment. Make sure you start with quality seeds that are safe for sprouting (more on that later).
1. Soak the seeds
- First, scoop a few tablespoons of seeds into a quart jar. No need to get scientific–just eyeball it. While it doesn’t seem like a lot initially, the seeds will spread to fill the jar, so be careful not to overdo it. The more seeds you sprout, the better an ideal you’ll have for how many seeds of any particular variety will fill out the space.
- Next, cover the mouth of the jar with either a piece of cheesecloth or a sprouting screen and secure with a canning ring or thick rubber band if needed.
- Pour about two cups of water into the jar through the cheesecloth or screen. Use bottled water, or if you have city water, use tap water that has been sitting out overnight and allowed the chlorine to evaporate.
- Twirl the jar and swirl the water around to rinse the seeds. Drain the excess water through the screen, taking care not to spill any water.
- Add two more cups of non-chlorinated water and allow the jar to rest for at least eight hours, ideally overnight.


- The next morning, drain the water from the previous night.
- Add two cups of non-chlorinated water to the jar.
- Rinse and drain the seeds again.
- Place the jar upside down in a bowl, and rest the jar at a slight angle to increase drainage and promote airflow, decreasing the risk of mold growth. The slanted surface also allows the seeds greater surface area to grow and expand within the jar.
- Rinse and drain the seeds twice daily for three to five days. Rinsing seeds in fresh water daily reduces the risk of bacterial growth. Draining the seeds after each rinse prevents seeds from rotting before they even begin to sprout.
4. Process and harvest
- After about three days, seeds will begin sprouting. You’ll see translucent stems develop into tiny yellow leaves that turn green with light and time. Sprouts will expand to fill the quart jar.
- Keep the jar in a dry, well-lit location to encourage photosynthesis, which renders the nutritive elements of sprouts more readily digestible.
- When sprouts have reached an inch long and the leaves have turned from green to yellow, the sprouts are ready to use. Let sprouts drain fully, as this halts growth.
5. Store sprouts
- No further processing of sprouts is required after you allow the sprouts to dry fully in the mason jar. Don’t cap the jar with an airtight seal, as this shortens the shelf life of sprouts. Place the jar in the refrigerator–sprouts will keep for up to two weeks. Remove sprouts as needed and add to salads, sandwiches, soups–anything you want!

What to consider when growing sprouts
Growing sprouts isn’t difficult, but you’ll need to buy just a few things to get started.
Seeds
As with anything, you’ll want to start with quality seeds for the best finished product. Not all seeds are created equally, and while food grade seeds are great for cooking, you’ll see a much higher germination rate with seed quality sprouting seeds.
Shop this collection of high-quality, non-GMO seeds especially bred for sprout production. Whether you’re looking for something specific like Mung Bean Sprouts or Alfalfa Sprouts, or you want a more variety like our exclusive Sprout Lovers Collection, we've got you covered. Confidently browse our organic sprouting seeds knowing that your purchase is the right choice for your health and the planet.


Equipment
While a canning jar, canning ring, and sprouting screen are one tried-and-true technique to growing great sprouts, as you gain experience you might find other methods and tools that work just as well. We recommend starting with these three essentials, but when you’re ready to expand your production you can invest in sprouting kits like this Victorio 4 Tray Seed Sprouter.
Don’t have any mason jars at home? Make your life easier and order the 1 Quart Mason Jar And Sprouting Lid Combo and you’ll have everything you need to grow great sprouts. If you have mason jars already, Sprouting Lids are sold separately.

Conclusion
Growing sprouts at home is about as simple as gardening gets. All you need is a canning jar, canning ring, sprouting screen, and a little patience to be well on your way to healthier, more flavorful meals.
Browse our collection of the highest quality sprouting seeds on the market, and snag one of our complete sprouting kits to make growing your own veggies even easier!
